
This is part two of my blog post about how we flipped our own house, doing a renovation and updating in 6 weeks, prior to listing it for sale. In Part One, I showed you the major changes upstairs when we took a wall between the dining, living room, and kitchen down to a half wall, to create an open concept, updated a bathroom, and painted + recarpeted the whole thing. This post is all about the downstairs of our bi-level house, the surprise “free” money we got to make changes to the outside and has a recap of what we spent vs what we sold it for – I.e., a look at our investment vs profits.
Turning a dungeon into a bright family room
Before
The biggest change downstairs, by far was in our family room. The family room in our bi-level was originally an unfinished room when the house was built out (as we could see from the original blueprints we found in our house!) and at some point in the ’70s the homeowners had finished out that room with lots of dark paneling, tavern-style trim, and heavily trowled stucco texture on the walls and ceiling.
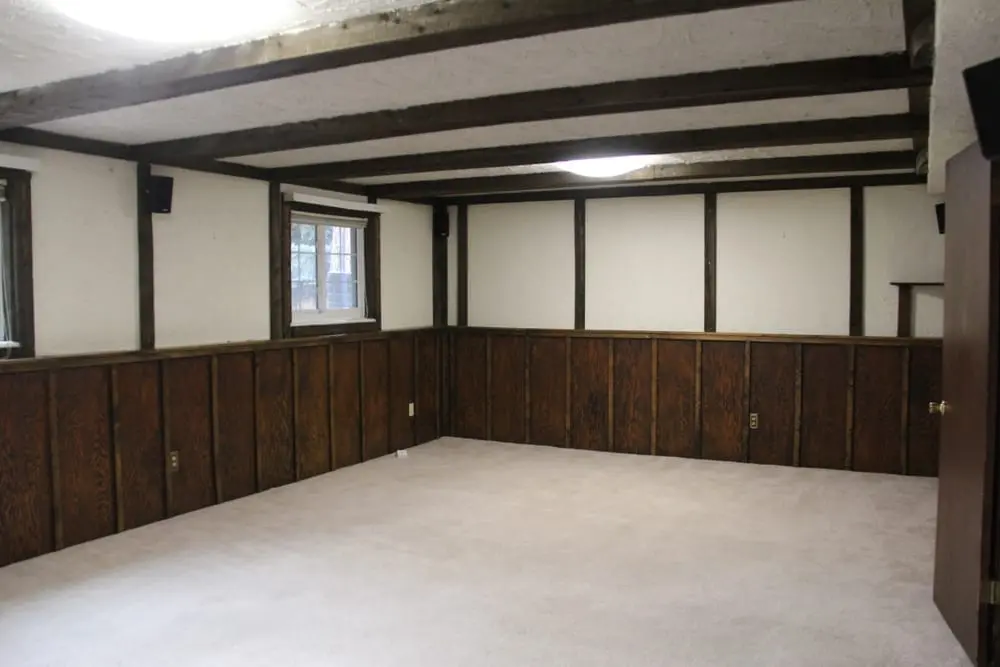
We used to joke that this was our Brotherhood of Thieves room because it looked exactly like the 1800’s whaling bar where Chris worked on Nantucket.
I wish I had a closeup of the texture so you could see how bad it was. This room was top of our list for being redone when we moved into the house. I did at one point decided I was going to take the vertical trim pieces off the walls, only to discover that the sheetrock underneath had not been taped, mudded or textured, so we lived with it like this the entire time we owned the house.
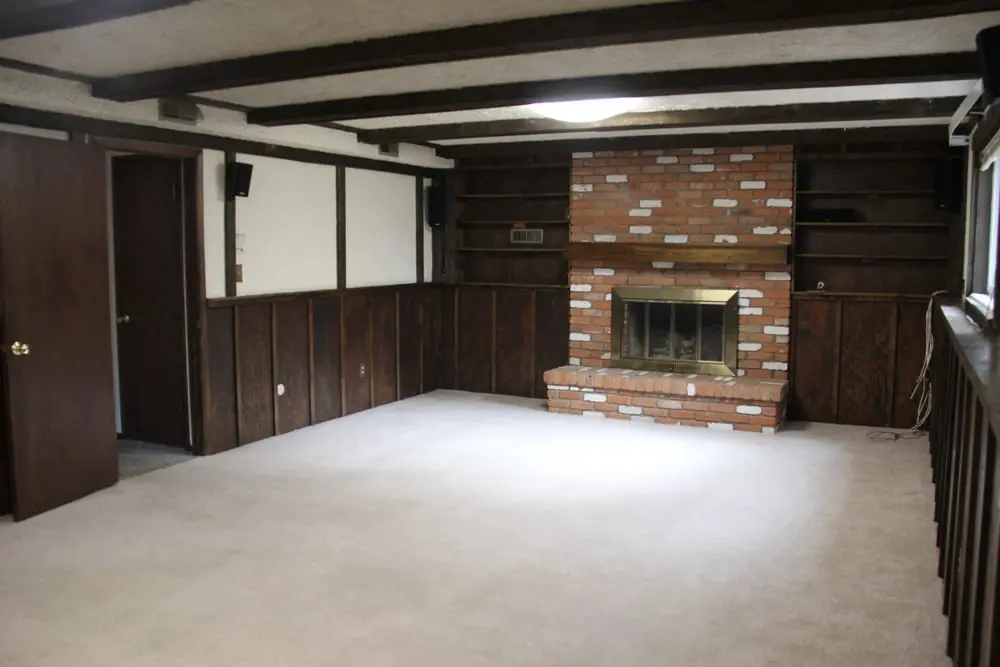
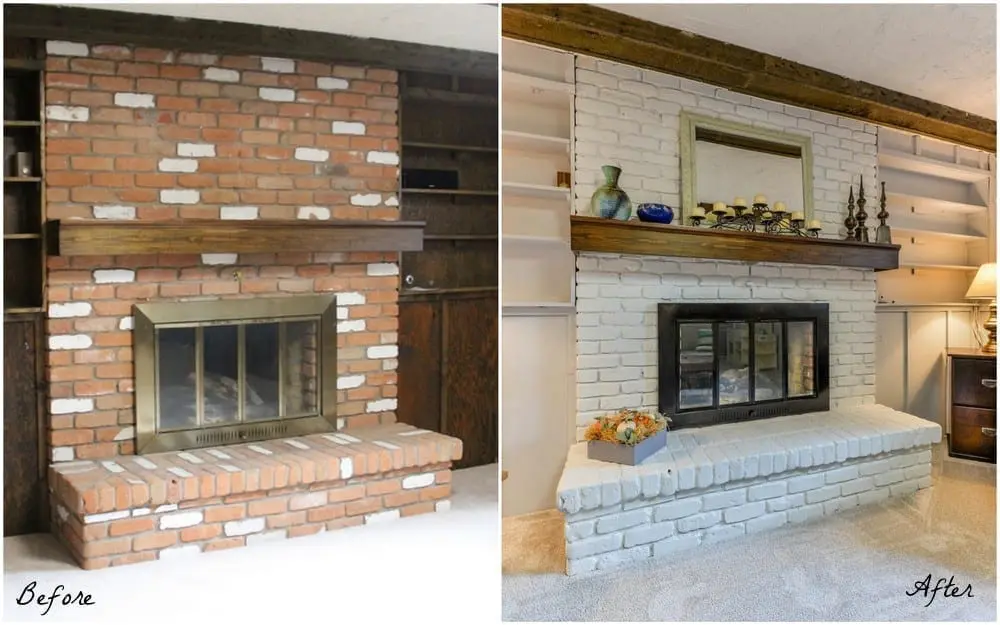
To get rid of the Nantucket whaling bar aesthetic, all the extra wood trim pieces were removed, the door (which had been damaged by a previous owner’s dog) was removed, and I had the whole top half of the walls re-sheetrocked. The texture was made of cement, so there was no removing it, and the best option was just to cover it all up. We left the ceiling as-is to save money. Once all the texture was gone, I had painters come in and paint the entire room, including the fireplace.
After

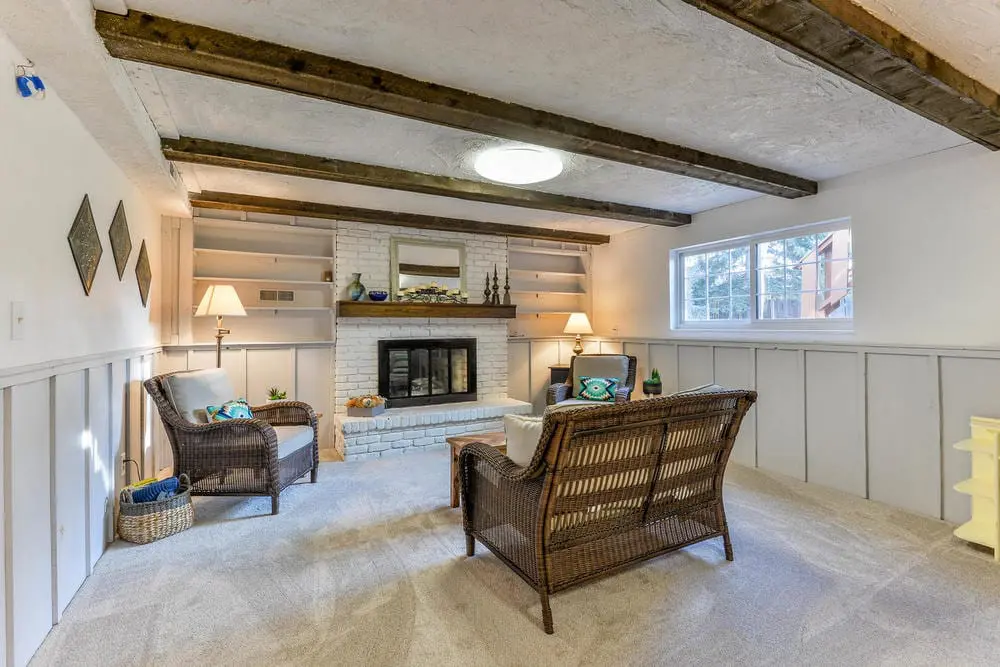
I went with the “in” palette of white and gray to brighten things up and keep things neutral for our buyer.

We kept a few wood accents throughout the room, the beams on the ceiling, the mantel, and the top of the “built-in” desk that Chris and I had made when we first moved in and needed a place to work. For the first 2.5 years of Road Warrior Creative, this was where all the magic happened – albeit in much darker and dingier surroundings.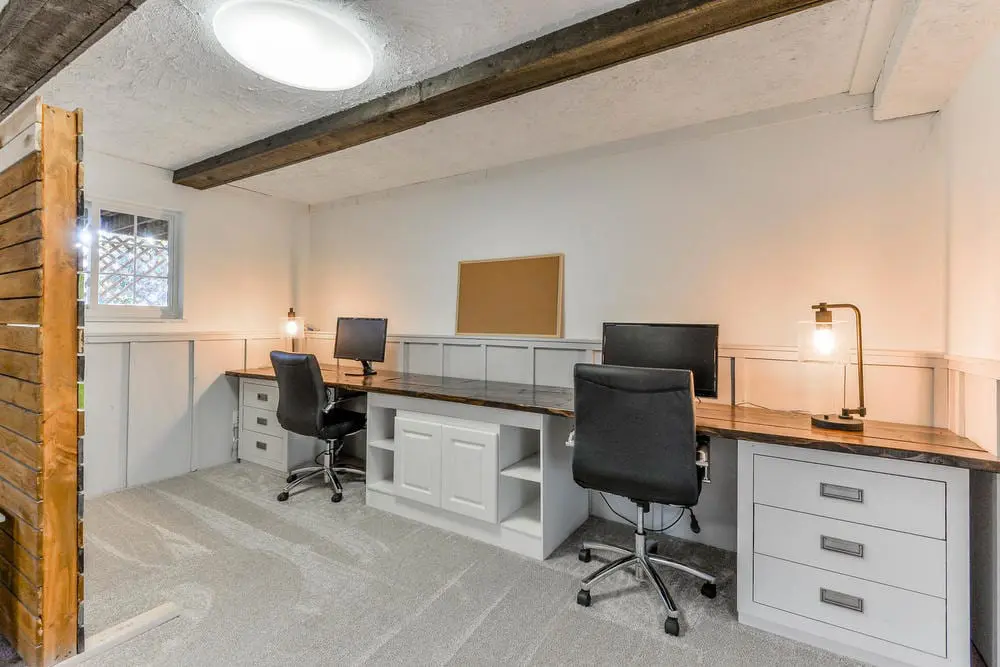
The fireplace was one of my parts of this transformation. Painting it white to cover up the old pattern made a huge difference, and I updated the brass surround simply by spray painting it black with high-heat Rustoleum spray paint.
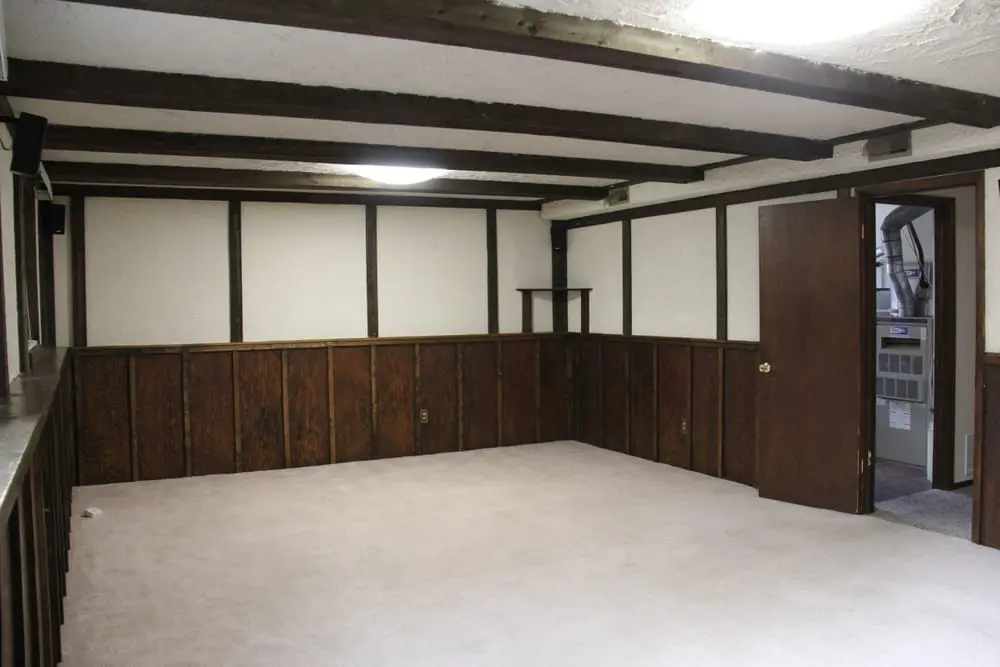
Other Changes Downstairs
Aside from the major change in the family room, most of what we did downstairs was minor. Painting in one bedroom and the laundry room, replacing carpet, and patching holes in the laundry room ceiling from prior plumbing work.
We had the unexpected expense of having to deal with black mold in the downstairs basement.
The shower downstairs had a soggy corner when we moved in and the previous owners had covered up the moldy grout with caulk. Since we were operating under the plan of “remove all possible objections,” there was no leaving the shower as-is once we realized what the situation was. We ended up having the added expense ($1200) of our tile guy cutting out the rotten portion of drywall, treating the mold, re-drywalling, retiling that section, and regrouting the entire shower.
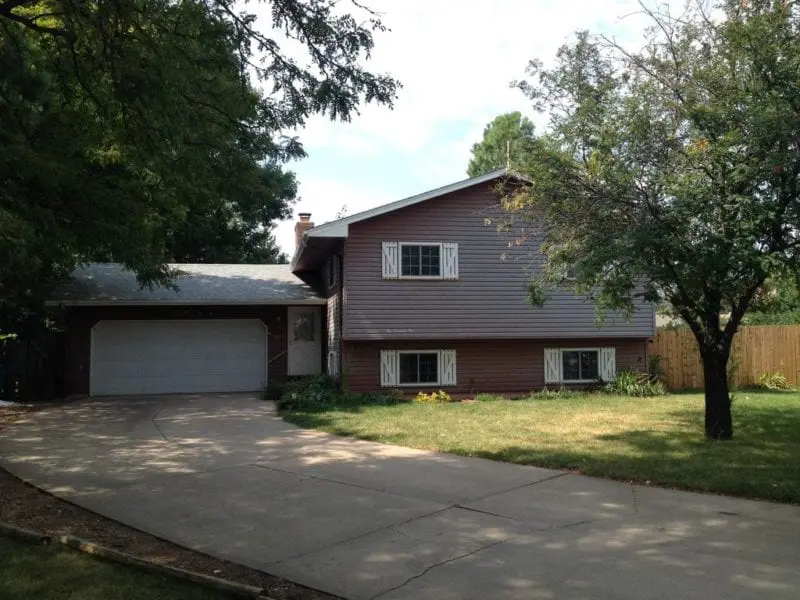
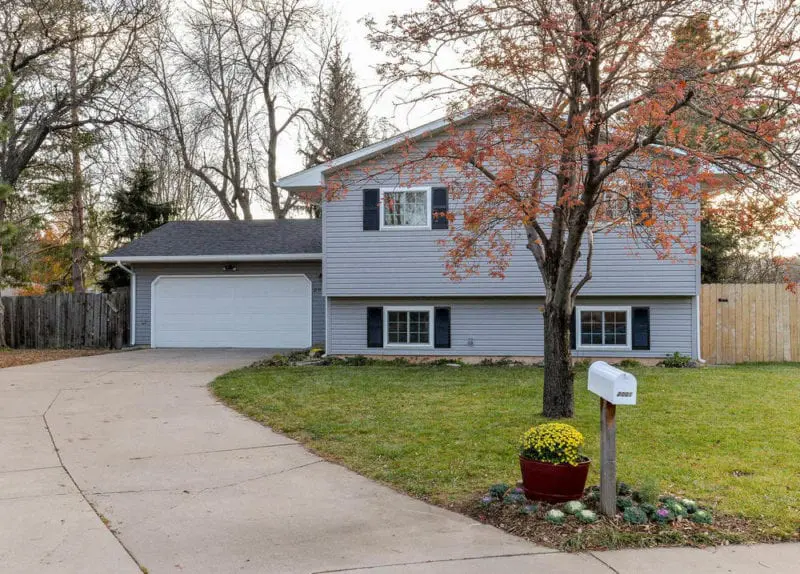
A New Roof & Siding For Free
One of my least favorite things about our Colorado house was its barn aesthetic. It had vinyl siding that was super faded – rusty red in some areas, nearly gray in others – and fence-like shutters.

On top of the age of our siding and normal wear and tear, there was a spot in the back where Chris had the grill too close to the house and had actually melted it! ? The siding was not in great condition, but we figured there was nothing we could do about it, we certainly didn’t have the money to reside the house, and even if we did, I’m not sure we would have put the money into it as a pre-sale investment.
I had read that it was possible to paint vinyl siding, and so I thought, why not ask the house painters for an estimate when they came to quote painting the two big rooms inside. This was when the BEST thing possible happened. As I walked the painter around the outside of the house, we realized that that right side of the house, a side we rarely looked at, was literally covered in holes from a hail storm. I called my insurance adjuster and it turns out that during the two weeks we were down in Austin, there was a major hailstorm in Fort Collins. He came out to look and determined that not only was there siding damage, but also the roof and skylight would need to be replaced.
Normally, insurance companies will only cover the cost of replacement siding on the side that is damaged, however, our adjuster worked to get the entire house resided since there was no way they would be able to match the existing siding. That meant that, for the low cost of our deductible, we got a completely new roof, new siding, and new shutters, spending just $1000 to get $20,370.43 worth of work done. That took our house from this:
Before
to this:
After
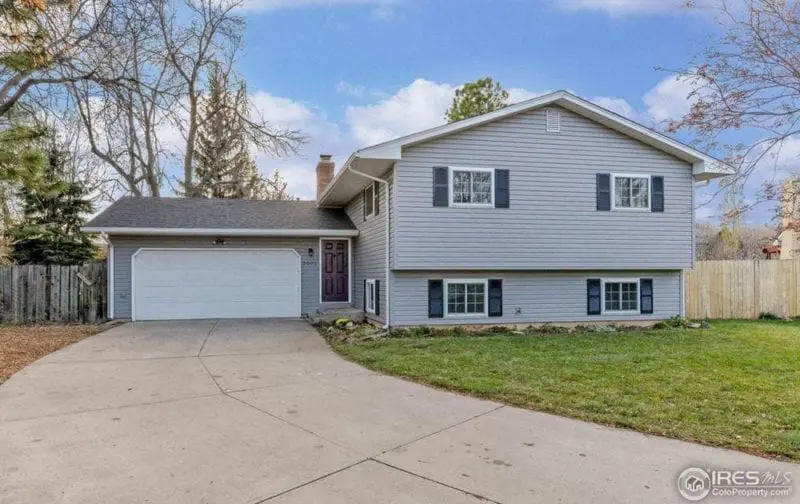
In addition to new siding and shutters, I also removed the dated screendoor and painted the front door with a can of purple paint that I just happened to have in the garage. Down by the curb, one of my neighbors helped me cut down a giant evergreen bush that was swallowing our mailbox, and I covered the stump with a flowerpot to improve the curb appeal.
Investment and Profit: The Financial Breakdown
Budget
After getting all the quotes, we budgeted $16,606.68 for the renovation. With a 10% contingency (just over $1600), our total budget was $18,267.35. Here’s a breakdown of what that budget looked like:
Item |
Cost |
Upstairs Bathroom |
|
| Bathtub wall tile – labor | $980.00 |
| Floor tile – labor | $432.00 |
| Move and reinstall toilet | $75.00 |
| Bathtub reglazing | $435.00 |
| Wall tile – materials | $150.00 |
| Floor tile – materials | $80.00 |
| Grout | $30.00 |
| Bathroom Subtotal | $2,182.00 |
Kitchen |
|
| Countertops – material + labor | $1,620.00 |
| Backsplash – labor | $775.00 |
| Backsplash – material | $100.00 |
| Sink | $125.00 |
| Cart or island (staging furniture) | $320.79 |
| Kitchen Subtotal | $2,940.79 |
Living/dining room |
|
| Wall modification – labor + material | $950.00 |
| Flooring (carpet) – amount is for all carpeted spaces | $4,167.89 |
| Paint | $1,810.00 |
| Living/dining Subtotal | $6,927.89 |
Bedrooms |
|
| Carpet | Covered Above |
| Paint | $145.00 |
| Bedrooms Subtotal | $145.00 |
Family Room |
|
| Drywall – walls (+ laundry room ceiling) | $1,200.00 |
| Paint | $2,031.00 |
| Carpet | Covered Above |
| Family Room Subtotal | $3,231.00 |
Exterior |
|
| Insurance Deductible – Roof + Siding | $1,000.00 |
| Shutters (6 pairs) | $180.00 |
| Exterior Subtotal | $1,180.00 |
Sources of Funding
Now, we didn’t just have $18,000 sitting around waiting for us to re-do our house with. If we had had that, we would have definitely made these improvements a lot sooner. Not having the money in our bank account, this was where the risk of “flipping” our house came in: we borrowed money to fund the renovation, counting on the seller’s market in Northern Colorado and that we would make the money back plus some. Here’s how we got together the money for the flip:
Home Depot Credit Cards
Chris and I both opened separate Home Depot credit cards, not jointly, but separately, as individuals. Mine had a $6,000.00 credit limit and Chris had a $8,000.00 credit limit. With these credit cards, we paid for:
- countertops + installation
- new kitchen sink
- carpeting (free installation)
- tile, mastic, and grout for both bathrooms and the kitchen backsplash
- paint for all the places where we painted ourselves (not the painters)
- new light switch and outlet covers
- some other small miscellaneous things
Everything we bought on the Home Depot credit cards was 12-24 month with no interest, so we were able to make small monthly payments until the house sold, then pay off the cards after closing, without having to pay any interest.
Credit Card Loan to Checking
One of my credit cards had a special running where you could withdraw cash up to your credit limit and use it for 6 months with no interest, so long as it was paid off at the end of that period. We had never taken advantage of credit card “special offers” because we’re so frugal and try not to buy anything we can’t already pay for. But Chris and I decided that, in this instance, taking cash out of a credit card was worth the risk. We borrowed $2,716.00 from my credit card to have available in our bank account to pay contractors with, with the plan of paying it back after closing but before any interest accrued.
Owner’s Distribution/Draw From Our Business
Once we had a good feel for how many contractors we would be hiring that would want to be paid right away, we ran calculations and determined that we needed to have more liquid cash available with which to pay them. That meant taking an extra draw from our business. Chris is the master of all our finances in the business and we try to keep a large cash cushion on hand in case someone is late paying us so we can still pay all of our bills and everyone’s salaries. At this time, last year, there wasn’t a ton of wiggle room in the business bank account, so we didn’t want to do anything crazy. We played it safe and only took an extra $3000 out of the business on top of our normal distributions.
Lowe’s Credit Card
When we decided in the last week of the renovation to make all the appliances stainless steel, neither of us had much wiggle room left in our Home Depot Credit Cards for a range, microwave, and dishwasher, so I headed over to Lowe’s and opened a credit card there with similar terms. I spent $1,326.34 on the appliances on a Lowe’s Credit Card, which required monthly payments of around $40 and had no interest for 12 months.
Garage Sale Cash
The last way that we helped to fund the renovation was by selling things during a garage sale. I sold some large items, including all our old white appliance, our sleeper sofa from Nantucket days, Chris’ old bike, our grill (which one of our neighbors had set on the curb with a free sign and Chris refurbished), and ended up making just over $700! It wasn’t thousands, but it was a big enough influx of cash to make a difference in our bottom line, and it helped reduce the number of things we needed to move to Texas or pay someone to get rid of.
Bottomline Profits
By the end of the renovation, we had spent $19,280.37. We went over budget, including our contingency, because of two things: (1) needing to remedy the mold situation in the downstairs bathroom and (2) deciding to make all the appliances in the kitchen match.
We listed the house for $400,000, but after 38(!!!!) showings, we realized that we needed to drop the price because of the time of year that we were on the market and because the busy road behind our house was a much larger deterrent than we expected (that was the #1 reason realtors cited in feedback as why their clients wouldn’t make an offer). After 4 weeks, we went under contract for $378,000, which was lower than I wanted but we ultimately decided it was worth accepting to get the house sold so we didn’t have to think about it.
With a sales price of $378,000, after closing costs and fees + paying off our mortgage, we were paid $80,691.16. Out of that $80,691.16, $19,280.37 was what we spent on the remodel and either needed to be paid back to a credit card or our bank account.
Our final profit was $61,410.79.
Looking back on the house flipping experience…
Putting money into a renovation just to sell a house for a higher price is definitely nerve-wracking, especially if you’re taking a risk and putting a lot of it on credit as we did. That I planned and executed the remodel without Chris and while caring for a four-month-old added another layer of complexity.
Before we took the house flip on, we did a lot of risk analysis and calculating, which made us more confident in making the investment, both financial and in the extra time our family was apart. Obviously, it paid off in a big way and helped to fund our move to Texas. I also learned a lot along the way about working with contractors and stretching a budget to make a big impact.
Have you ever put money into your house just to make it more sellable? If so, I’d love to hear what you did and how it paid off. Leave me a comment below!
Leave a Reply