Earlier this year, when I rebuilt my website to eliminate a bunch of accessibility issues, I decided to also replace the Instagram feed in the footer of my website with native posts instead. There is a serious lack of tutorials on how to truly import Instagram posts into WordPress (most articles out there, instead, describe how to display Instagram posts in WordPress, which is not the same thing). This post is intended to fill that gap. It explains how I exported my posts from Instagram and imported them into my WordPress blog.
Why I Stopped Embedding Instagram Posts on My Blog
Past versions of my blog had a “Life Right Now” section in the footer of the website very similar to the one there currently.

This section was previously built using the Smash Balloon Instagram Feed Pro plugin. It displayed a row of the five most recently published images on my Instagram feed. When an image was hovered over, it showed a preview of the caption, the date of the post, likes, and comment counts.

When an image was clicked on, the post opened in a lightbox showing the full caption and some number of comments, if any existed.
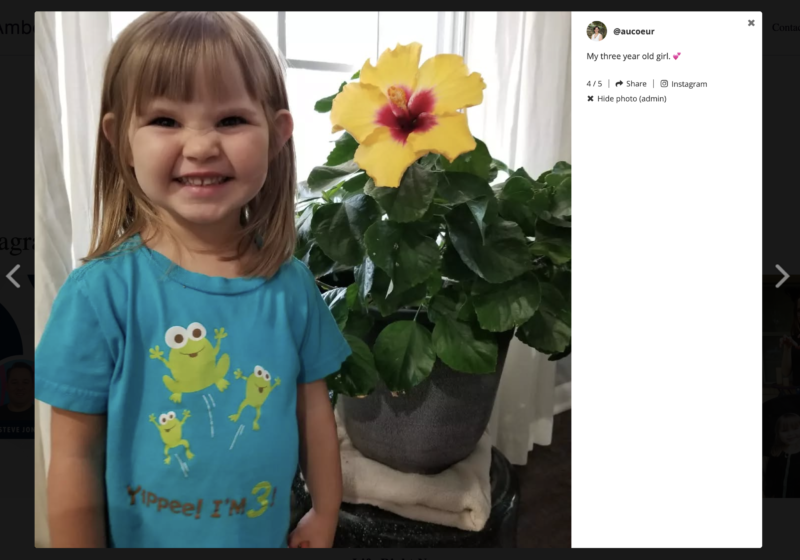
In the lightbox, clicking my username would link people over to my Instagram account, and clicking Instagram links over to the post itself. There were buttons that allowed users to navigate through posts in the feed, and if a post had multiple images, those could also be viewed.
This all seems great. Why change?
Accessibility Problems with Smash Balloon Instagram Feed Pro
When I started investigating the accessibility issues on my website, I found that many were caused by the Instagram Feed Pro plugin.
Here are some of the problems I identified both with our Accessibility Checker plugin and via manual accessibility testing:
- There is no visible focus outline when tabbing to the images.
- The content visible on hover is not visible on keyboard focus or read out to screen reader users.
- Every image in the feed has two links, both of which lack an accessible name:
- The first link opens the modal and has screen reader text of “Open” without any context as to which image will be opened.
- The second link goes to Instagram and has the image in it. The image includes the caption as alt text (excellent!) but includes style=”display:none,” which hides it from screen readers and sighted users, resulting in an empty link.
- The “link” to open the modal should be a button (not a link) and is missing
aria-haspopup="true"to tell screen reader users it will open a modal. - When the lightbox modal opens, keyboard focus is not shifted into the lightbox, it stays behind on the page making it difficult for keyboard only users to access the modal content.
- If focus is set in the lightbox, it is not locked within it, which makes it difficult to find all the elements and means a user can accidentally tab out of the modal without closing it.
- The lightbox close button is not keyboard-operable and is missing an accessible name. (It’s coded as an anchor tag without an href when it should be a button.)
- The buttons to change the post in the lightbox are incorrectly coded as links and have a name that might confuse screen reader users (“Next slide” when “Next Instagram post” would be more meaningful).
- The buttons to change the image in posts with multiple images are not keyboard-operable because they are divs instead of buttons. (They also don’t have an accessible name.)
- Hitting escape closes the lightbox, but the focus does not return to the element that triggered it, and users are set on the browser tab, so they have completely lost their place on the page.
- Links open in new tabs without warning.
Now, I am not a developer. I can write some code, but when I was rebuilding my site, I wanted a low-code solution, not to completely rewrite my Instagram feed plugin to fix many accessibility problems via a JavaScript patch.
I explored the settings in the plugin and determined that I could turn off some problematic elements, such as the lightbox. This solved many problems, but it still had empty links to Instagram and missing alternative text to describe the images to blind and visually impaired people.
I realized that, without a ton of custom code, there was no way I could use the Smash Balloon Instagram Feed Pro plugin and achieve my goal of having an accessible website.
With that in mind, I started to explore the accessibility of competitor Instagram feed plugins before realizing something else…
I Hate Instagram Now
I used to love Instagram and spend hours on it daily, following food bloggers, crafters, and stay-at-home moms. For a time, when we were running our marketing agency, Road Warrior Creative, our content specialist and I put a lot of effort into trying to grow a following for the agency and creating an intentional feed. (See the @roadwarriorwp Instagram here.)
But that love for Instagram fizzled.
For more than a year after our third daughter was born, I struggled with postpartum depression and anxiety. Time on Instagram and the curated, fake lives of Instagram influencers contributed to my depression and feelings of inadequacy as a mother and entrepreneur. Taking a break from Instagram was one of the top things I did to help my mental health.
When I returned to Instagram, it was primarily to post pictures of our lives for my family. I rarely looked at my feed or surfed hashtags. When I did, I realized Instagram was all video now, which I didn’t want to create or consume.
For a time, I logged into Instagram purely to post pictures for the footer section of my website and never engaged with anyone else. Even that was rare: I posted twice in 2023, 16 times in 2022, and once every other week in 2021.
As I was assessing the accessibility issues with my Instagram feed, a lightbulb went off: I don’t like the Instagram platform, so there’s no reason to keep using it. I can create the same section without Instagram.
So, instead of fixing the accessibility of that section, in the spirit of data liberation, I planned to rebuild the “Life Right Now” section with posts on my website, including importing all my old content from Instagram.
Here’s how I did it.
How to Export Posts from Instagram and Import Them into WordPress
1. Get A CSV of Your Instagram Posts
The easiest way to import posts into WordPress is through an XML feed or a CSV import. I had hoped that Instagram would provide me with an easy data export that could be used, but (of course) meta doesn’t make it that easy to liberate your data in importable format.
After researching many website-based tools and browser extensions, I identified Apify’s Instagram API Scraper as the best tool for getting a CSV of my Instagram posts. Apify is a tool developers use to build, deploy, and publish data extraction and web automation tools. It has a console where you can use premade “actors” to get data and export it as an HTML table, JSON, CSV, Excel, XML, or RSS feed.
I signed up for a free account with Apify, and, it turns out, that’s all I needed. I thought I might need to pay for a month’s usage, but the 30-day free trial covered my needs for a single scrape of my Instagram account, which had just under 1500 posts.

How to Scrape Instagram with Apify
If you want to use Apify to get your Instagram data, here are the steps:
- Open the Actors section of the Apify Console and find the Instagram API Scraper.
- Go to the input tab.
- In the “Instagram URLs you want to scrape” field, add the full URL to your Instagram profile, starting with https://.
- Set “What do you want to scrape from each page?” to “scrape posts.”
- Set “Max results per URL” to a number greater than the number of posts on your Instagram profile (if you don’t set this, it will not return them all).
- Click “Save & Start” and wait for the datasets to be built.
- Download your data in CSV format.
Learn more about the Instagram Scraper here.
2. Format Your CSV for Import
CSVs exported from Apify need work before they can be imported into WordPress as posts. They have a lot of data you don’t need and are missing some key information that you do need (like titles).

Delete Unnecessary Columns
I imported my CSV file into a Google Sheet. I deleted a bunch of unnecessary columns, such as columns with IDs referencing posts or child posts on Instagram, the author bio column, columns with image dimensions, and more.
If you have Instagram posts with multiple images, there will be multiple image columns with URLs to each image on the Instagram CDN. They will have headings like “childPosts/1/displayUrl”. Keep those; they’re needed to import the photos into WordPress.
Clean Up Captions
You might want to clean up the captions to remove hashtags, URLs, or other information. I didn’t because I was running fast, but depending on how clean you want your imported posts to be, this may be worth the effort.
Add Titles
WordPress posts should have titles, but Instagram posts don’t have them. I added a “Title” column to the left of the caption and started writing titles for each post.
I then quickly realized that manually writing titles for ~1500 posts would take way more time and effort than I wanted to spend in a Google Sheet, so I turned to our friend ChatGPT to assist.
I installed the GPT for Sheets and Docs Google Workspace Extension and purchased $10 in ChatGPT credits, then entered this prompt in the title cell:
=GPT("Write a short and simple title (7 words or less) that's more descriptive than creative",C3)In this formula, C3 references the cell that holds the caption on the same row.
Basically, this prompt has ChatGPT look at the caption and then generate a 7-word or shorter title. After seeing it generate a few strange titles, I added the “more descriptive than creative” phrasing. This ensured that the generated titles summarized the caption rather than trying to be too edgy or creative (which resulted in incorrect titles).
Once I knew it would work, I dragged the formula down the entire column to have it create titles for all 1500 posts in a matter of minutes. (Generating titles for all those posts only used about $4 of the ChatGPT credits I had purchased.)
I then spot-checked the titles and made a few corrections here and there, but otherwise, I accepted the generated titles as-is for now (maybe forever if I never go back through to fix them).
3. Plan Where and How to Import Posts
Blog Posts vs Custom Post Type
Before importing your Instagram posts into WordPress, you need to know where you want to store them. Are they posts on your blog? Or do you want to create a separate custom post type for your Instagram posts?
Initially, I thought about creating a custom post type for my Instagram posts. It’s easy to create custom post types with a simple PHP function in a custom plugin or with a plugin like Advanced Custom Fields. But I wasn’t sure that I wanted the URL structure to be different for Instagram posts from blog posts, and there might be instances when it made sense for them to be in the main loop with blog posts.
Typically, one of the reasons for creating a custom post type is to have a different archive layout for posts in that post type than for your main blog. This website is built with the Twenty Twenty-Four theme and full-site editing, which makes it easy to create a different layout for any individual category archive, so I decided to import the posts into my blog and use a category to organize, design, query or exclude them.
I already had a “Wordless Wednesday” blog post category from my Nantucket days when I would post a single image with no description or text. Combining Instagram posts into that category made sense, but I renamed it from Wordless Wednesday to Shorts since I would continue posting in that category not just on Wednesdays.
How to Handle Multiple Image Posts
Instagram can display multiple images in a single post, which can be swiped or clicked through one at a time in a carousel. If you have multiple image posts on Instagram, you’ll need to consider how you want these displayed only on your website.
A more challenging but doable option is to create custom fields to store the image URLs and create a similar image carousel on your website for each post. I decided that functionality wasn’t necessary and went with an easier approach to displaying multiple images: inserting additional photos into the body of the post.
Once I had my edited CSV of posts and knew where I wanted to store them on my website, it was time to run the import.
4. Import Posts into WordPress with WP All Import
WP All Import is my favorite tool for importing posts of any type into WordPress. It’s a plugin that we use all the time at Equalize Digital, so it was the obvious choice for importing many Instagram posts to WordPress.
You can check the WP All Import Docs for detailed instructions on using it to import posts into WordPress, but here are some specific notes on things I did to set up support for posts going into the block editor and to handle importing multiple images in a post (if they exist).
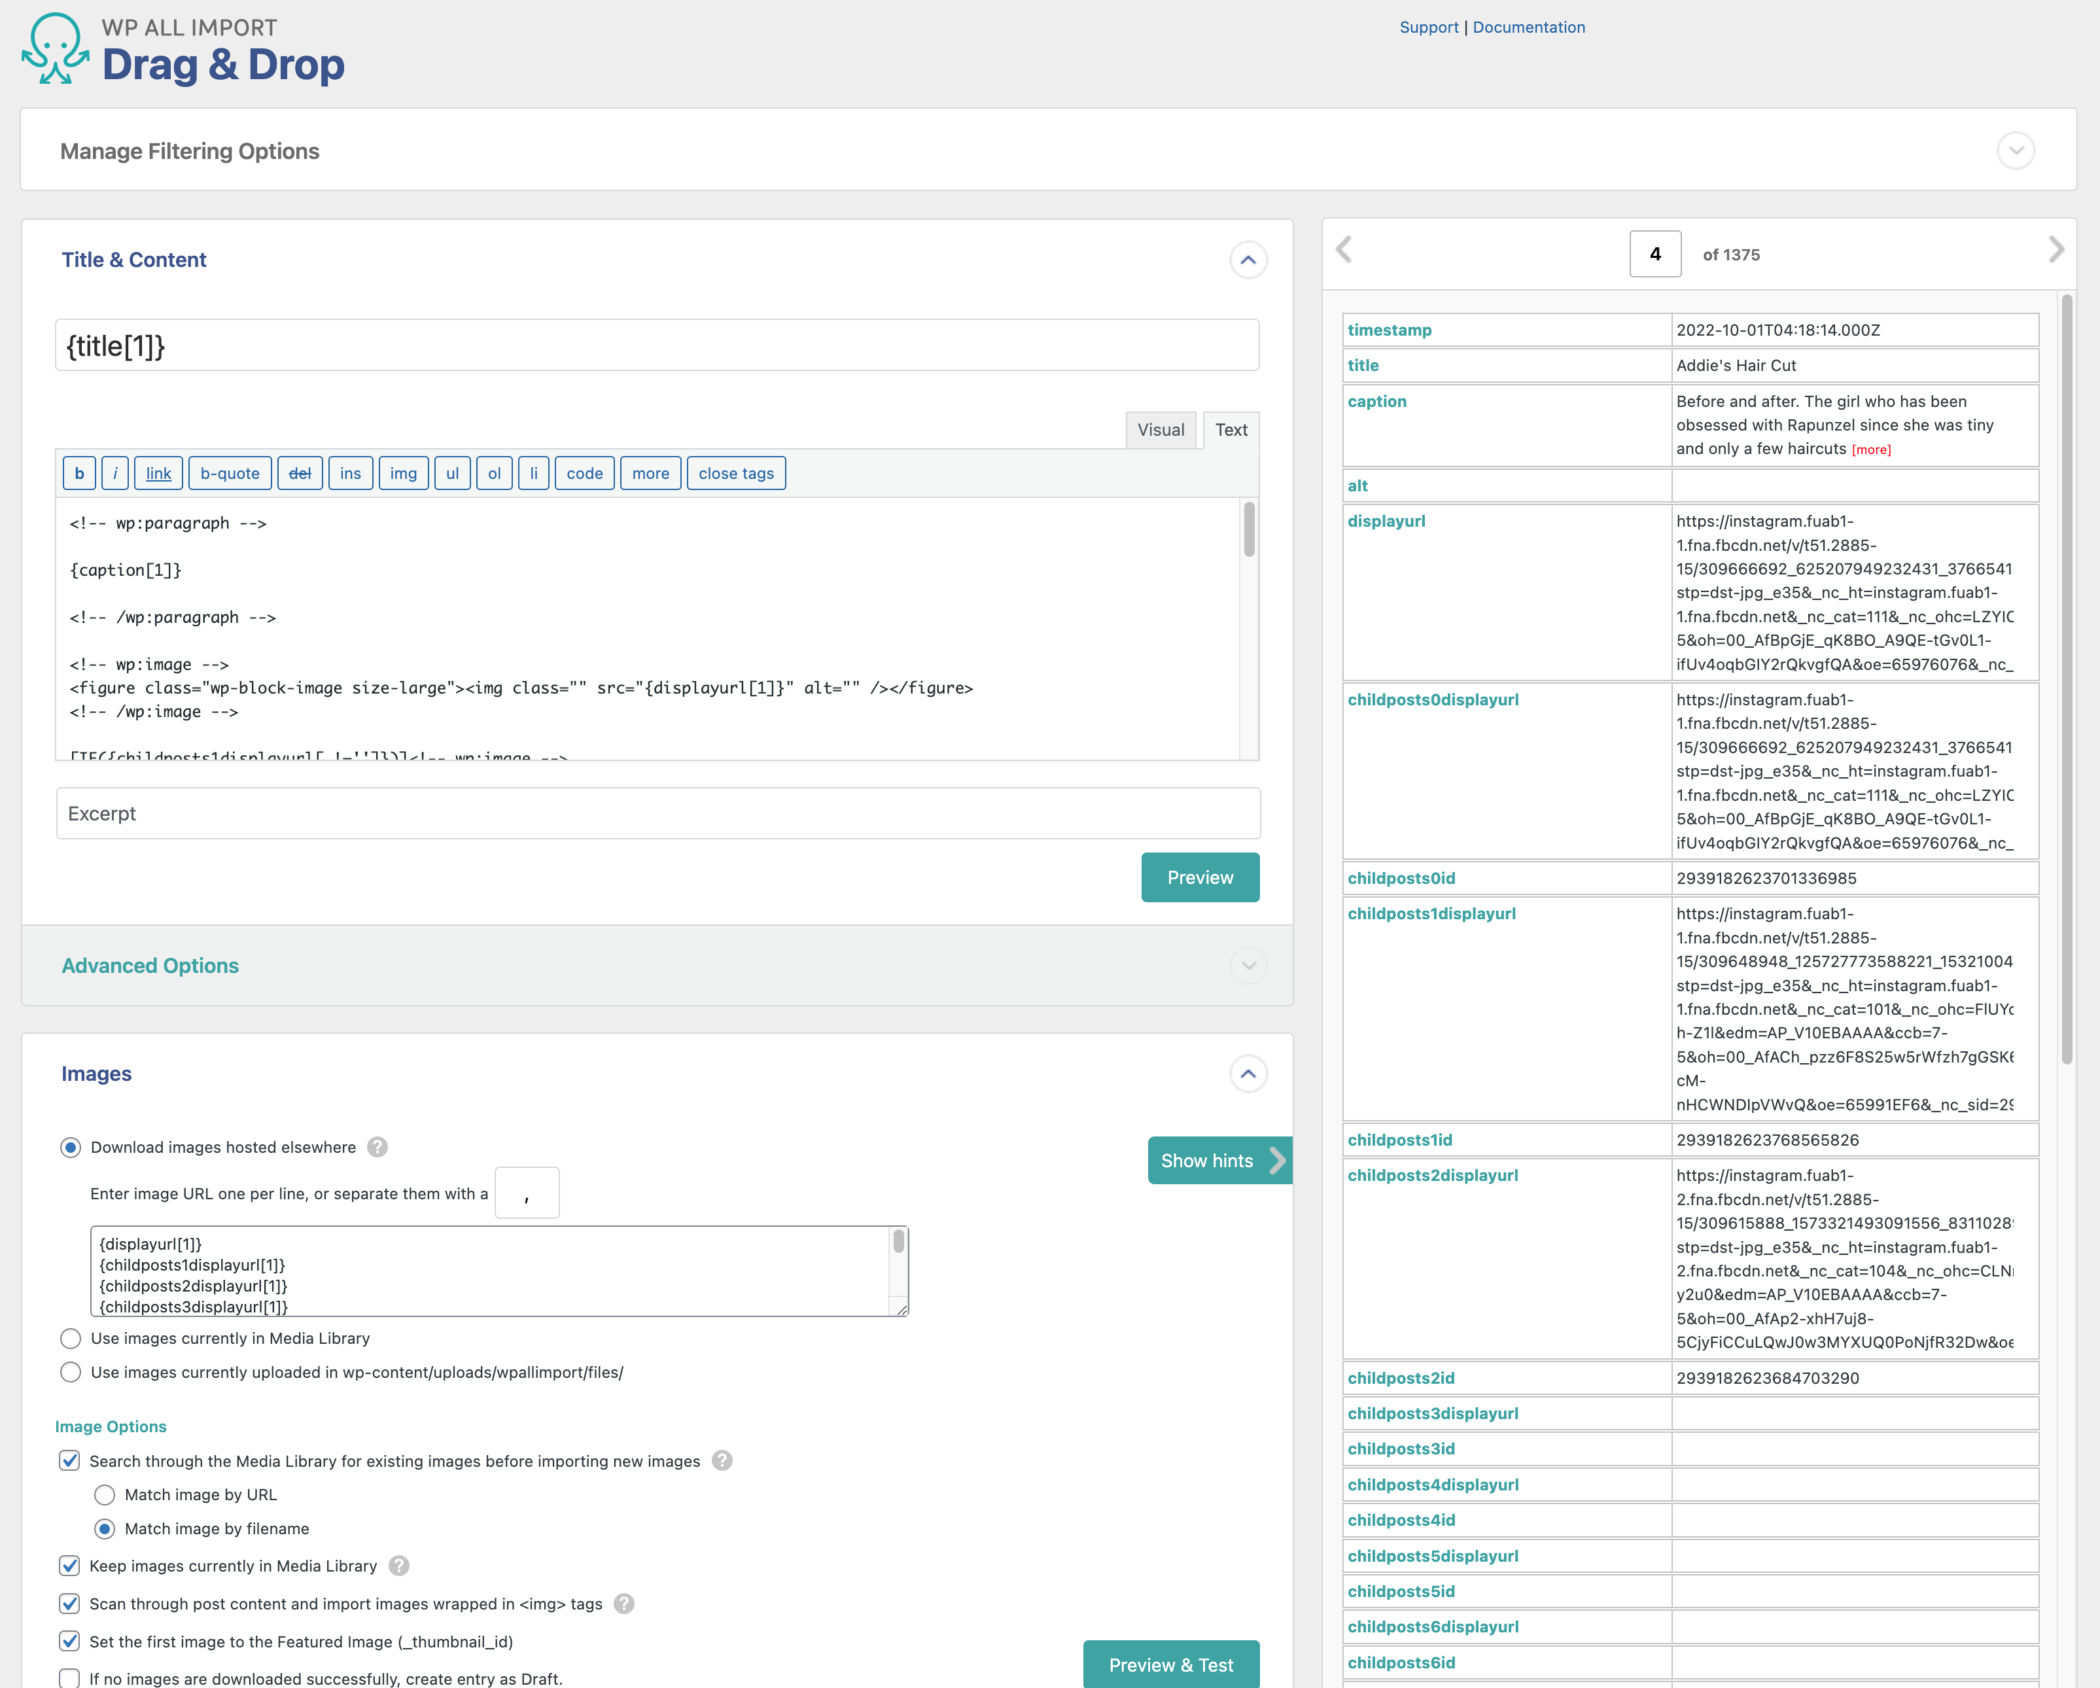
Formatting to Import the Content
Here’s the text I used to import the caption and additional images.
<!-- wp:paragraph -->

{caption[1]}

<!-- /wp:paragraph -->

<!-- wp:image -->
<figure class="wp-block-image size-large"><img class="" src="{displayurl[1]}" alt="" /></figure>
<!-- /wp:image -->

[IF({childposts1displayurl[.!='']})]<!-- wp:image -->
<figure class="wp-block-image size-large"><img class="" src="{childposts1displayurl[1]}" alt="" /></figure>
<!-- /wp:image -->[ENDIF]

[IF({childposts2displayurl[.!='']})]<!-- wp:image -->
<figure class="wp-block-image size-large"><img class="" src="{childposts2displayurl[1]}" alt="" /></figure>
<!-- /wp:image -->[ENDIF]

[IF({childposts3displayurl[.!='']})]<!-- wp:image -->
<figure class="wp-block-image size-large"><img class="" src="{childposts3displayurl[1]}" alt="" /></figure>
<!-- /wp:image -->[ENDIF]

[IF({childposts4displayurl[.!='']})]<!-- wp:image -->
<figure class="wp-block-image size-large"><img class="" src="{childposts4displayurl[1]}" alt="" /></figure>
<!-- /wp:image -->[ENDIF]

[IF({childposts5displayurl[.!='']})]<!-- wp:image -->
<figure class="wp-block-image size-large"><img class="" src="{childposts5displayurl[1]}" alt="" /></figure>
<!-- /wp:image -->[ENDIF]

[IF({childposts6displayurl[.!='']})]<!-- wp:image -->
<figure class="wp-block-image size-large"><img class="" src="{childposts6displayurl[1]}" alt="" /></figure>
<!-- /wp:image -->[ENDIF]

[IF({childposts7displayurl[.!='']})]<!-- wp:image -->
<figure class="wp-block-image size-large"><img class="" src="{childposts7displayurl[1]}" alt="" /></figure>
<!-- /wp:image -->[ENDIF]

[IF({childposts8displayurl[.!='']})]<!-- wp:image -->
<figure class="wp-block-image size-large"><img class="" src="{childposts8displayurl[1]}" alt="" /></figure>
<!-- /wp:image -->[ENDIF]

[IF({childposts9displayurl[.!='']})]<!-- wp:image -->
<figure class="wp-block-image size-large"><img class="" src="{childposts9displayurl[1]}" alt="" /></figure>
<!-- /wp:image -->[ENDIF]
This has a few parts. All items in curly braces come from WP All Import and represent the columns in the CSV. For example, {caption[1]} references the caption for the image.
To ensure that elements get imported correctly, adding the expected WordPress block editor HTML comments is helpful. This ensures that images will render as images in image blocks and not just URLs to the image file.
I started the body with the caption wrapped in the block editor comments for a paragraph block.
<!-- wp:paragraph -->

{caption[1]}

<!-- /wp:paragraph -->
Images are all wrapped in block editor comments to ensure that they are added in image blocks:
<!-- wp:image -->
<figure class="wp-block-image size-large"><img class="" src="{displayurl[1]}" alt="" /></figure>
<!-- /wp:image -->
The image comments have a few parts:
<!-- wp:image -->starts the image block- There’s an opening figure tag that applies a class and sets the size (I made mine “large”):
<figure class="wp-block-image size-large">. - Then, an image tag with the
srcattribute set to the display URL column in the CSV:<img class="" src="{displayurl[1]}" alt="" />. If you have a column for alt text from Instagram, you could also fill that in, but unfortunately, I didn’t, so I left thealtattribute empty. - Closing figure tag:
</figure> - Comment to end the image block:
<!-- /wp:image -->
Following the first image, which always existed, I used WP All Import if statements to create conditional logic to see if other images existed in the post and then insert additional image blocks only if needed.
Here’s an example of an image wrapped in an if statement:
[IF({childposts1displayurl[.!='']})]<!-- wp:image -->
<figure class="wp-block-image size-large"><img class="" src="{childposts1displayurl[1]}" alt="" /></figure>
<!-- /wp:image -->[ENDIF]
Additional images are exported from the Instagram API with column headers that start with “child posts” and a number. So this example says, “If childposts1displayurl is not empty, then insert an image block with the the source of the image set to childposts1displayurl.
Using conditional logic is essential because you don’t want to import empty image blocks into posts.
My export from Instagram included columns up to “child posts 9,” so I had nine of these If statements for possible images included in the content section of WP All Import.
Images Import Settings
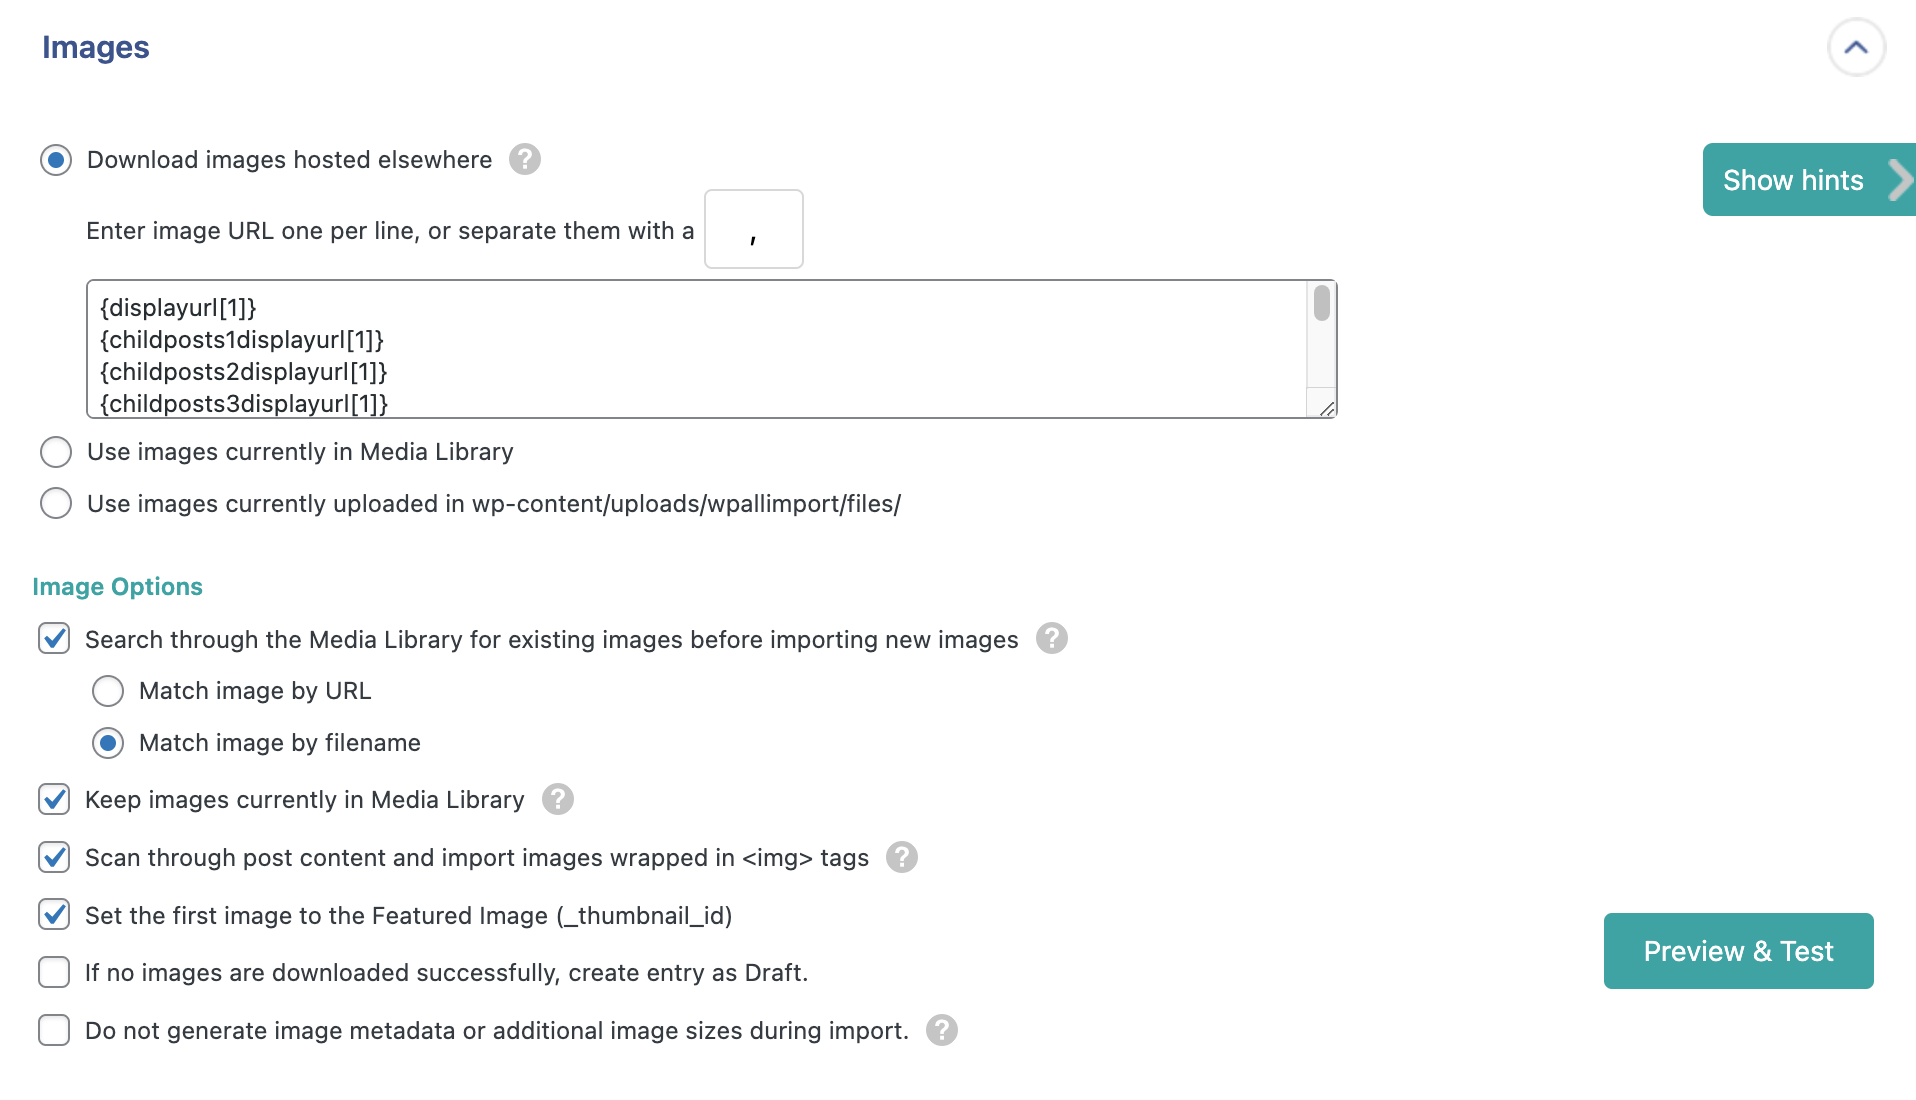
In the images section of the WP All Import template settings, I had the following configurations set:
- Download images hosted elsewhere: This ensures that the photos will be imported into the media library and not just displayed from the Instagram file URL. You must set this to ensure you have all of the images from Instagram stored on your website.
- In the Enter image URL one per line, or separate them with a… setting, I added all the column variables for each column in my CSV that contained a URL to an image on Instagram and set the separator to a comma.
- Other image options I enabled were:
- Search through the Media Library for existing images before importing new images. (This was unlikely to match, but just in case there was a duplicate, I enabled it.)
- Keep images currently in Media Library: ensures that no images were going to be deleted while I ran my import.
- Scan through post content and import images wrapped in <img> tags: a precaution in case my content tags missed something.
- Set the first image to the Featured Image (_thumbnail_id): This sets the first image in the content (which I had set to pull from the Instagram displayurl) as the featured image.
Other Key Import Settings
Other things I set in the import template were:
- Putting all posts in my “Shorts” category.
- Setting imported posts to published status.
- Setting the post published date to use the timestamp from the Instagram export so they would have the same published date as they originally had on Instagram.
- Closing comments and pingbacks.
- I used the Instagram ID (a column in the export) as the unique identifier to create new posts and differentiate each row in the CSV.
Beware! Turn Off Automations First
If you have any plugins that share new posts to social media or send emails when new posts are published deactivate these plugins or turn off the triggers before running your import.
Many of these plugins don’t pay attention to publish dates and will look for any new posts that didn’t previously exist. If you don’t turn them off before importing, you run the risk of sending hundreds (or thousands) of emails or social posts. You could flood your channels or seriously annoy your email subscribers.
In addition to turning off automations first, you may also want to run a test import on a staging site before you import posts into your live site.
Displaying Imported Instagram Posts
Once your content is imported (maybe on staging first), you can decide how to display it on your website. Here’s what I did:
Footer Recent Posts
To mimic the previous Instagram feed, I added a Query Loop block to my Footer Template part and set it to show five posts from the Shorts category (where all my Instagram posts were imported).
The Post Template in the Query Loop was set to a 5-column grid and included only the featured image, which was set to link to the post single.
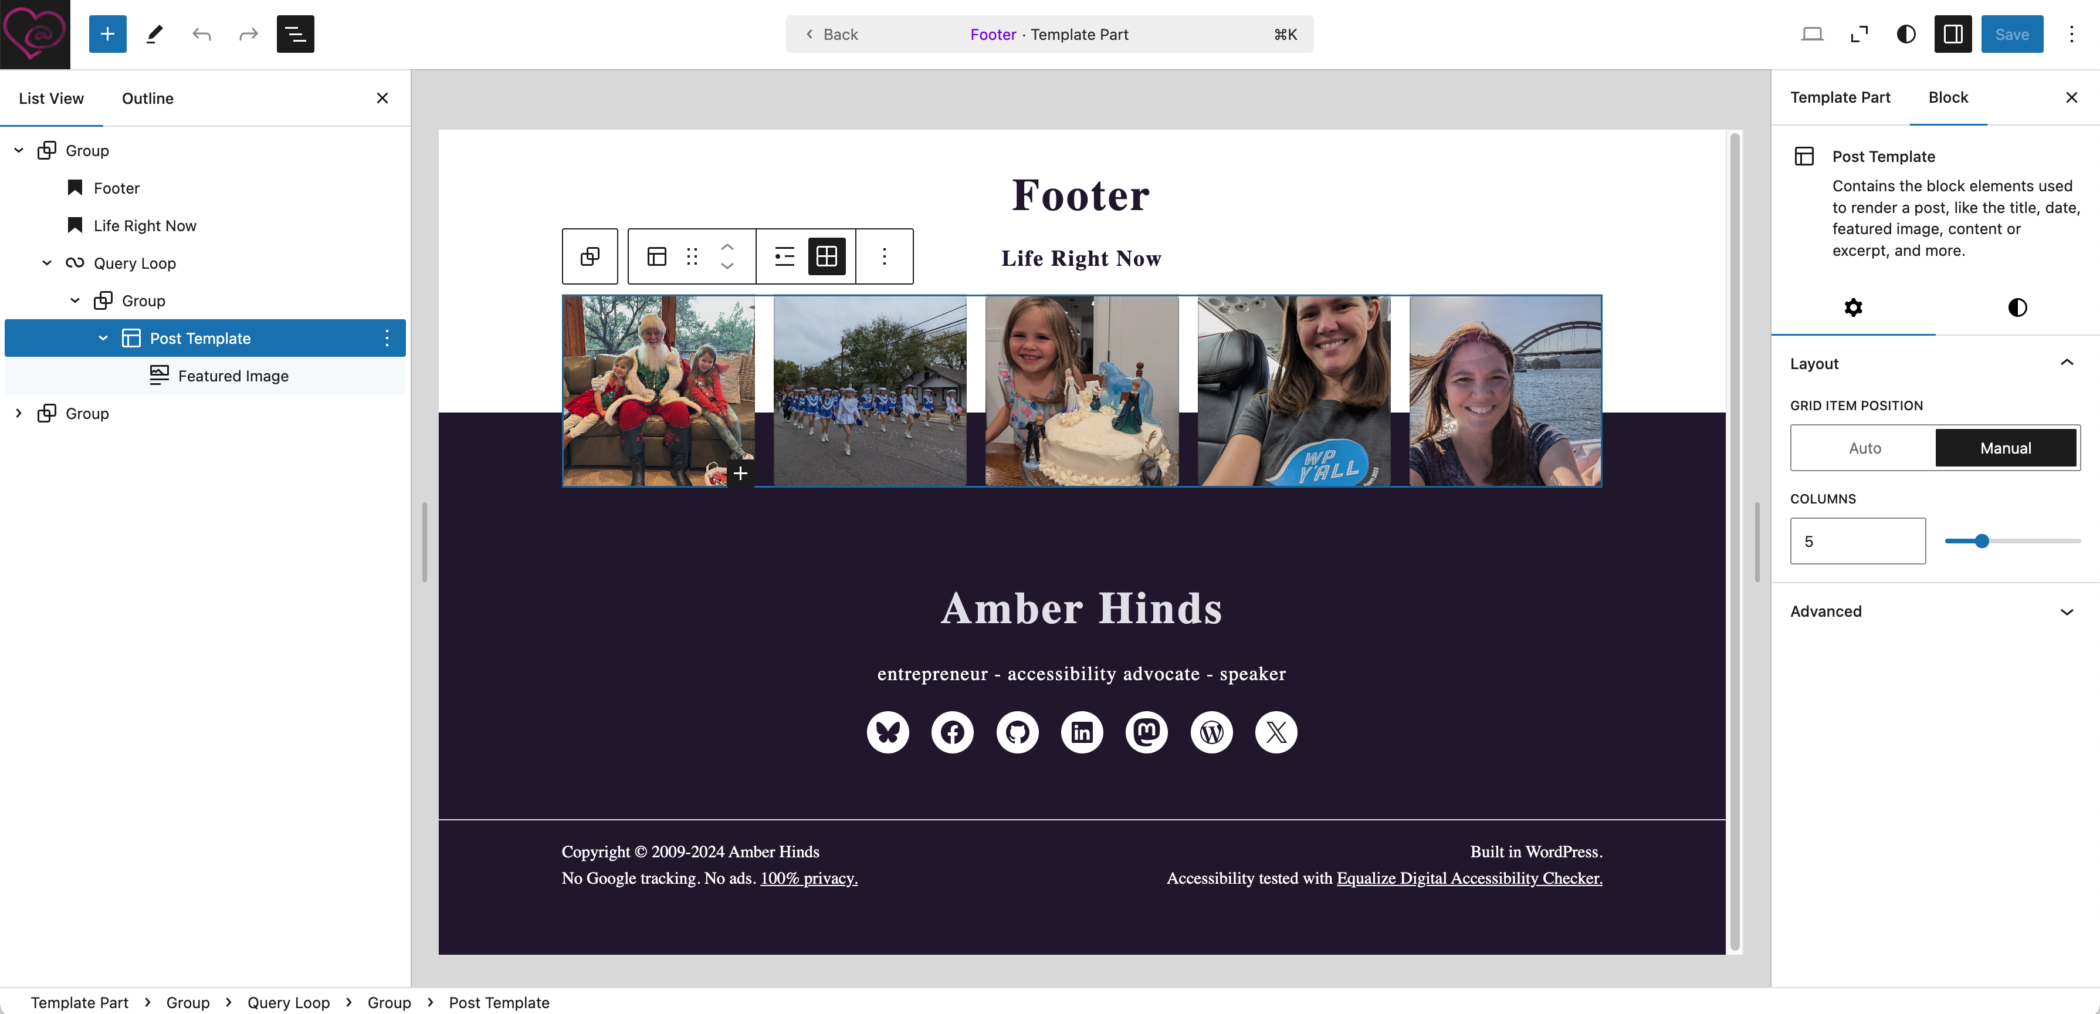
This gives a similar appearance to the 5 images across I had with Instagram Feed Pro but links the images to their posts where people can read the caption or see other photos that were included beyond the featured images.
In this context, the Query Loop block automatically uses the post title as the alt text on the image, so the links all have an accessible name that correctly describes where they go. 🎉
My post single template is very clean and simple so I didn’t modify it at all, but if you wanted you could design a different layout for your imported Instagram posts by category or if you’re using a custom post type.
Styling the Shorts Category
I wanted the Shorts category archive to look different from my main blog page and other category and tag archives, so I used the full site editor to create a different archive template for that one category.
To mimic an Instagram feed, I removed all content from the post template except for the featured image and set it to display posts in a 4 column grid.
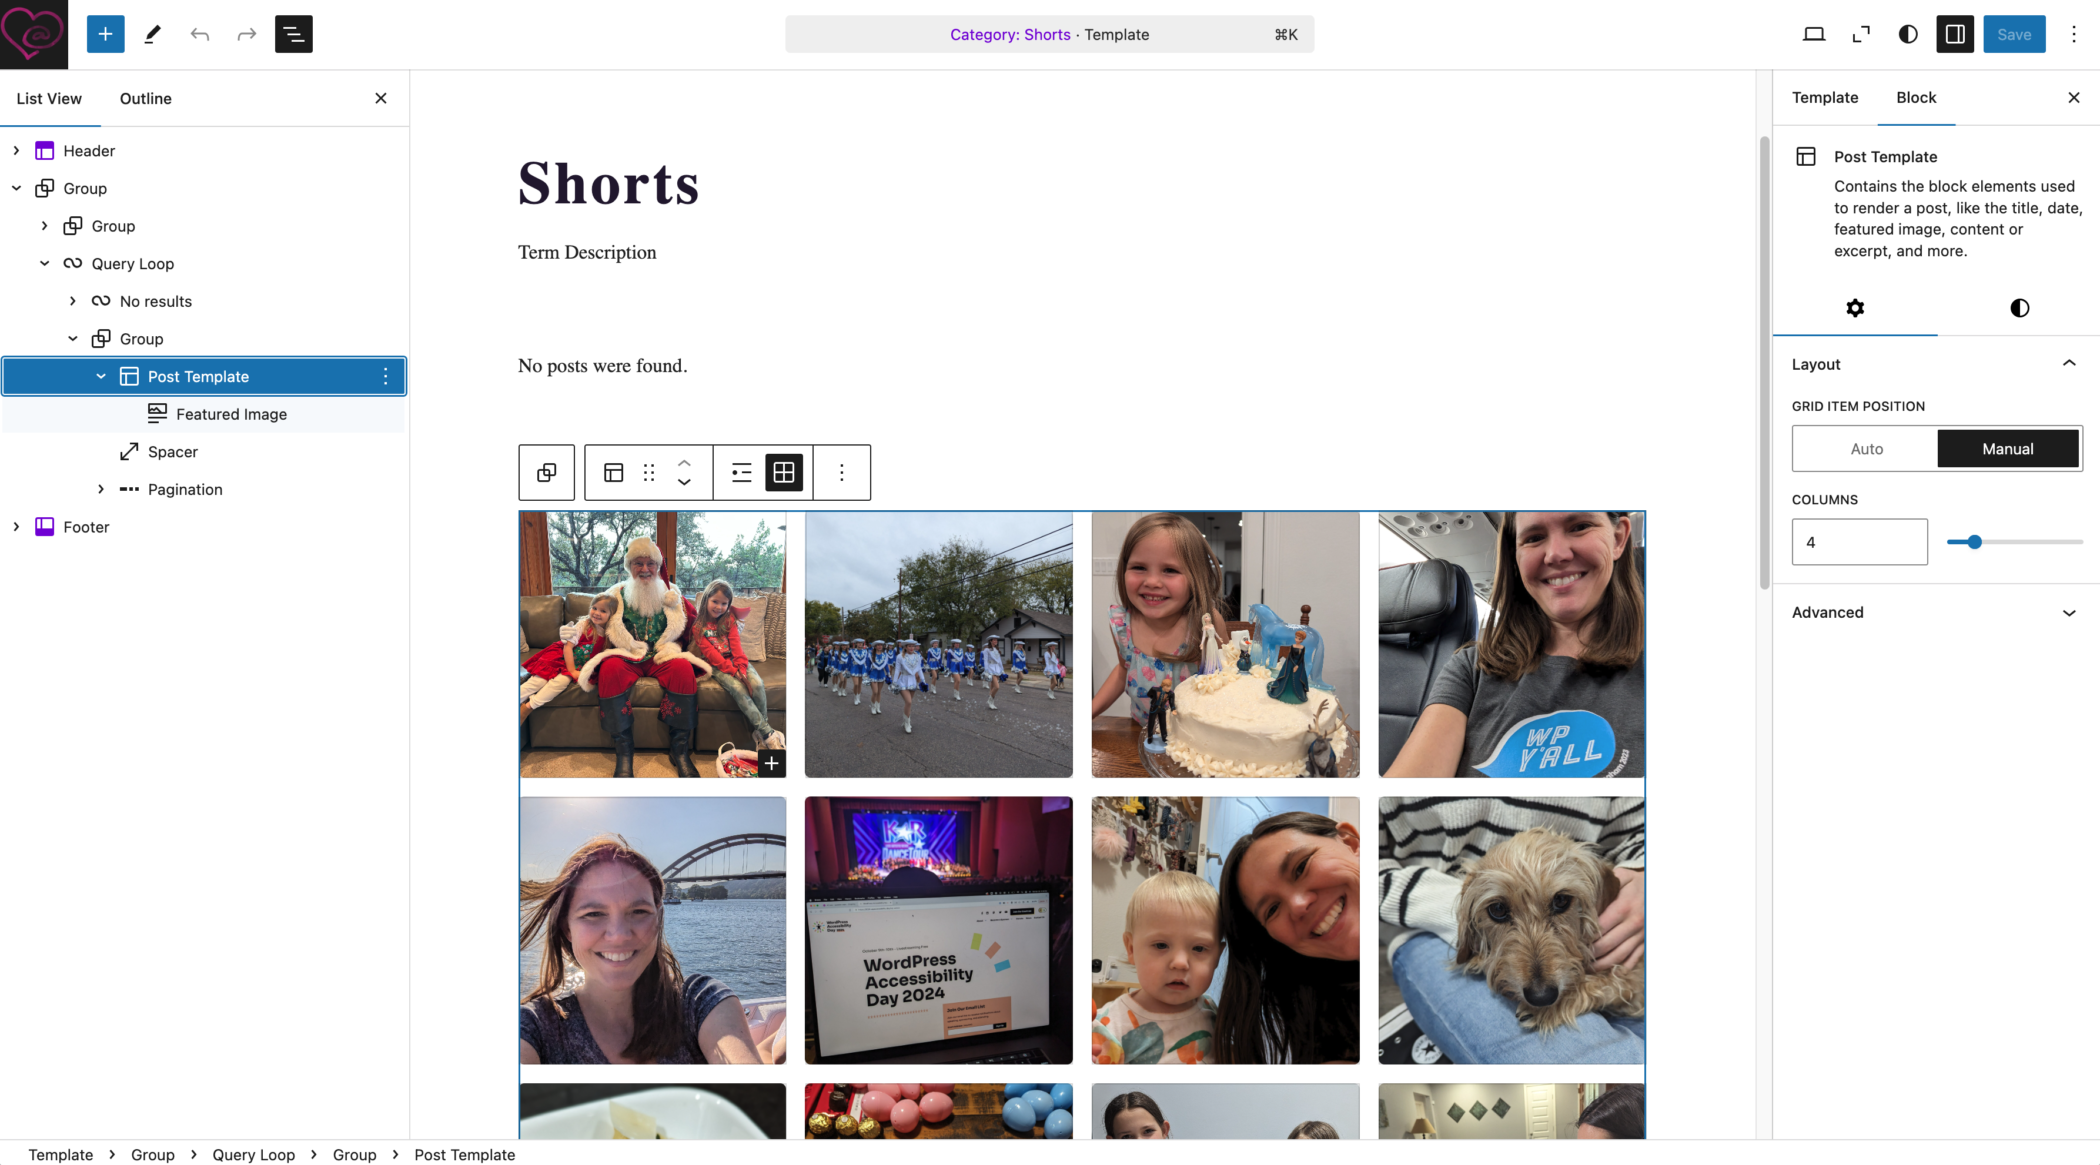
I also modified the Query Loop block to increase the number of posts per page. My default WordPress settings only include 14 posts per page. By changing the query loop block to use a custom query, I was able to set this one category archive to show 28 posts per page.
Previously, I would have done this with a PHP snippet in my functions file like this:
<?php

/** Change posts per page in the shorts category **/
add_action( 'pre_get_posts', 'amber_shorts_posts_per_page' );
function amber_shorts_posts_per_page( $query ) {
	if( $query->is_main_query() && is_category( 'shorts' ) && ! is_admin() ) {
		$query->set( 'posts_per_page', '28' );
	}
}
It’s handy that full site editing allowed me to modify the posts per page and design for one category without having to write a ton of functions to modify the loop and CSS to restyle things.
Removing Shorts from the Blog
I decided that, for now, I didn’t want any posts in the shorts category to show up on my blog page. I had hoped the query loop block would have an option for excluding categories from the loop, but it only has filters to include taxonomies. I debated the merits of manually adding all the categories on my blog to the category filter except for the Shorts category, but decided against that because I would have to remember to add any new categories in the future. (I imagined a scenario where I wasted an hour banging my head against a wall trying to figure out why posts in “new category I just created” were hidden from the blog.)
So, I used the tried and true method of removing posts in a specific category from the blog page: adding a snippet to the functions.php file in my child theme (yes, you can have a functions.php file in a full site editing theme).
This is the code I used to exclude Shorts from my main blog pages:
/** Remove shorts category from the blog **/
add_filter( 'pre_get_posts', 'amber_exclude_shorts_category' );
function amber_exclude_shorts_category ( $query ) {
	if ( $query->is_home && ! is_admin() ) {
		$query->set( 'cat', '-272' );
	}
	return $query;
}
Adding More Posts in the Future
Now that I’ve imported my Instagram posts to my website, I have abandoned Instagram completely. (You may have noticed it’s no longer linked in my footer.) However, if you’re still using Instagram and want to continuously import your Instagram posts to WordPress posts as they are published, you can import Instagram posts to WordPress with Zapier.
With Instagram out of the picture, I’m still working on the best way to quickly and easily post to this category from my phone. This prompted me to try out the WordPress app, which I’ll write about in my next post. Stay tuned!
Leave a Reply